Hello,
We refer to internal reports by a 6-digit number (eg. 100100). To simplify references in our documents, we create the reference with the document No as the author name. A writer just calls the report by {100100} in the text. This works excellently.
I want to import our document database (and regular changes) into endnote. I can write a RIS reference style like the one below.
TY - EDBOOK
A1 - 100100
DA - 02/02/2017
ET - 01
PB - Our Corp
ST - User Requirements Specification
TI - USER Requirements Specification
ER -
The problem is EndNote is too clever. When it imports the RIS, it parses the author field. The resulting import does not show any authors as all numbers seem to be stripped out. Examples include:
- “100100”->"",
- “10XXX00”->“XXX,”,
- “Smith,100100”->“Smith,”
Is there a way I can disable this?
Thanks in advance.
Mark
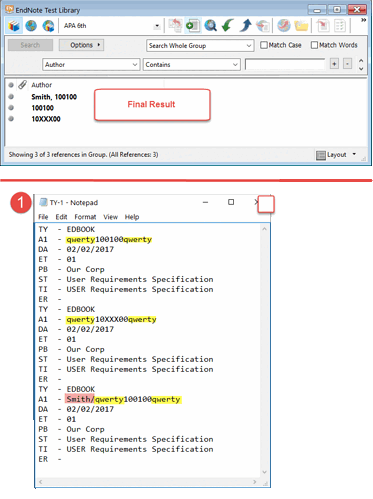
Unfortunately, at present there doesn’t seem to be a way for users to automatically change Endnote’s tendency to ignore importing numbers into the Author field in the format you stated. However, there is a workaround which involves data manipulation before and after importing and encompasses: 1) inserting letters or an obscure word around the document number (refer to image #1 top for sample final result); and 2) using Endnote’s “Find and Replace” feature to massage the imported data into the correct format.
The process is to:
-
First modify the author field data in the text file (containing the records to be imported). Modification will take two forms based on your three examples: (1) in situations where only the document number is present, insert letters or an obscure word in front and behind the document number with no spacing (the example used for the accompanying illustrations is “qwerty” - qwerty100100qwerty); (2) in situations where the field data includes an author name and document number (Smith, 100100), change the comma to a slash mark; insert letters/obscure word in front and behind the document number with no spacing; and delete the space following the slash mark (which was originally a comma). [Refer to image #1 bottom to see the modified field data.]
-
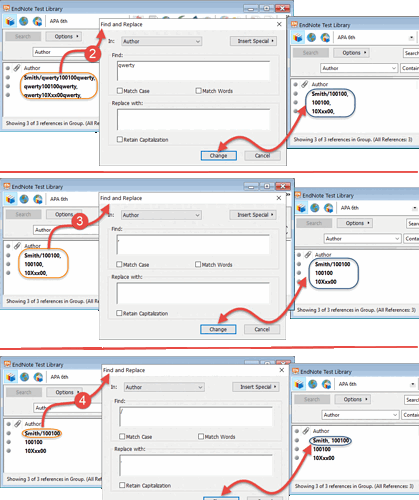
Once the author field data has been modified the text file can now be imported into Endnote. After importing, notice that Endnote inserted a comma at the end of the data field, thereby treating the data as an organizational name. Now use Endnote’s “Find and Replace” feature to search and remove the letters/obscure word (qwerty) from the Author field. [Refer to image #2 to see before and after results, along with the Find and Replace dialog box settings.]
-
Use Endnote’s “Find and Replace” feature to search and remove the comma from the Author field. [Refer to image #2 to see before and after results, along with the Find and Replace dialog box settings.]
-
Use Endnote’s “Find and Replace” feature to search and replace the slash mark (Smith/) with a comma and a blank space. [Refer to image #2 to see before and after results, along with the Find and Replace dialog box settings.]
-
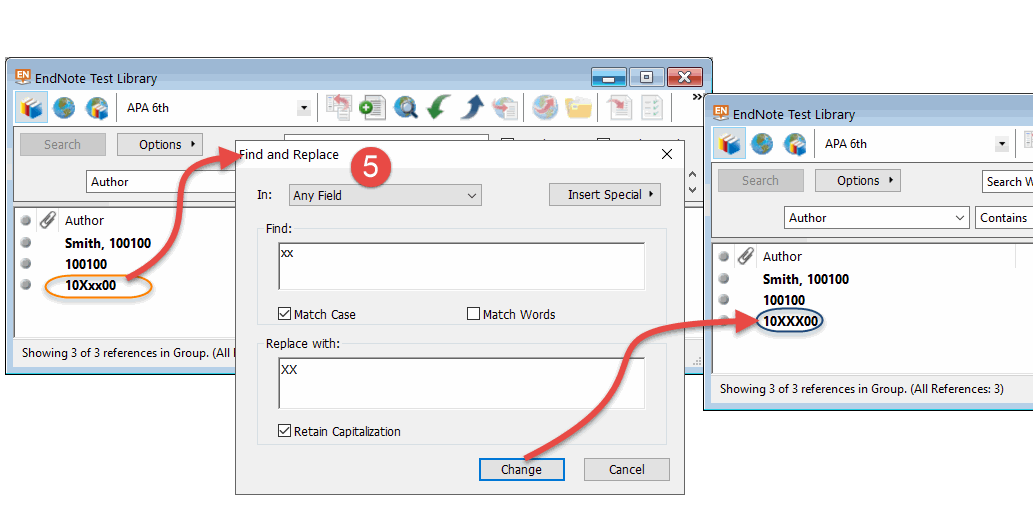
Finally, use Endnote’s “Find and Replace” to replace any lowercase letters (xx) appearing within the imported document number with uppercase letters. [Refer to image #3 to see before and after results, along with the Find and Replace dialog box settings.]
Unfortunately, at present there doesn’t seem to be a way for users to automatically change Endnote’s tendency to ignore importing numbers into the Author field in the format you stated. However, there is a workaround which involves data manipulation before and after importing and encompasses: 1) inserting letters or an obscure word around the document number (refer to image #1 top for sample final result); and 2) using Endnote’s “Find and Replace” feature to massage the imported data into the correct format.
Also, can you clarify your “Smith, 100100” example? Is this meant to be an in-text citation or what you want in the Author field? I interpreted your example to mean the latter and the explanation below is based on that interpretation (albeit, odd). If you meant the former or some other format please provide further information.
PROCEDURE
-
First modify the author field data in the text file (containing the records to be imported). [Note: Concatenation of words and letters described in the following can be performed in Excel if you have limited resources to facilitate the data modifications.]
Modification will take two forms based on your three examples: (1) in situations where only the document number is present, insert letters or an obscure word in front and behind the document number with no spacing (the example used for the accompanying illustrations is “qwerty” - e.g., qwerty100100qwerty); (2) in situations where the field data includes an author name and document number (Smith, 100100), change the comma to a slash mark; insert letters/obscure word in front and behind the document number with no spacing; and delete the space following the slash mark (which was originally a comma). [Refer to image #1 bottom to see the modified field data.]
-
Once the author field data has been modified the text file can now be imported into Endnote. After importing, notice that Endnote inserts a comma at the end of the data field thereby treating the data as an organizational name (Refer to image #2). Now use Endnote’s “Find and Replace” feature to search and remove the letters/obscure word (qwerty) from the Author field. [Refer to image #2 to see before and after results, along with the Find and Replace dialog box settings.]
-
Use Endnote’s “Find and Replace” feature to search and remove the comma from the Author field. [Refer to image #2 to see before and after results, along with the Find and Replace dialog box settings.]
-
Use Endnote’s “Find and Replace” feature to search and replace the slash mark (Smith/) with a comma and a blank space. [Refer to image #2 to see before and after results, along with the Find and Replace dialog box settings.]
-
Finally, use Endnote’s “Find and Replace” to replace any lowercase letters (xx) appearing within the imported document number with uppercase letters. [Refer to image #3 to see before and after results, along with the Find and Replace dialog box settings.]


